
Out-Of-Band Console Server
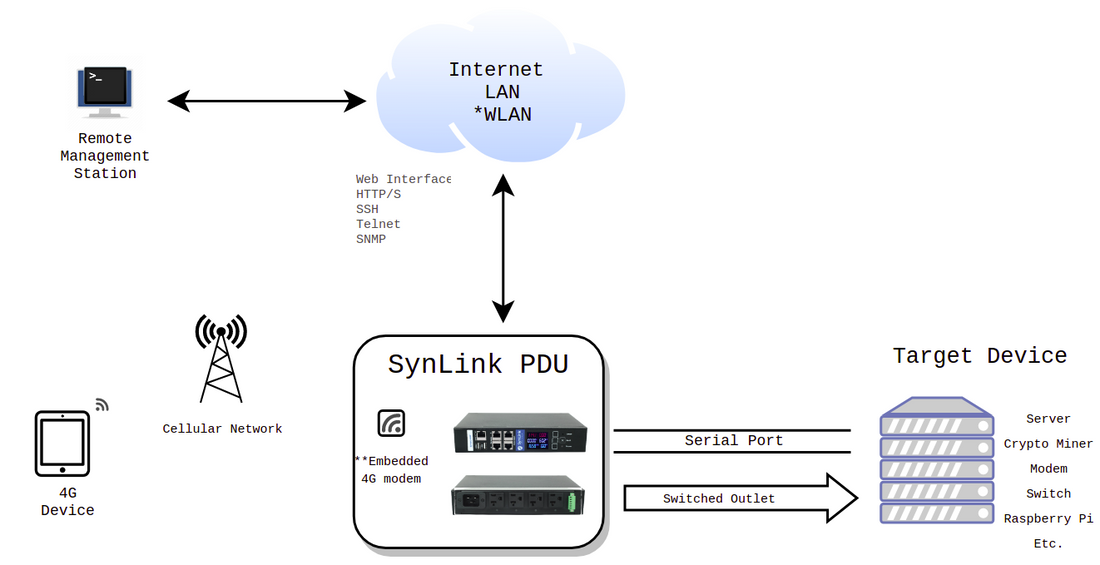
In addition to safe and reliable power delivery, SynLink PDUs give you fully secured, remote out-of-band access to your important assets such as servers, bitcoin/crypto miners, network devices, desktop PCs, etc.

What is out-of-band access?
Out-of-band refers to the way you can access your device “outside” of its typical (in-band) channels. Servers, routers, switches, miners, desktop PCs, etc. are typically connected to the local network and the internet via an Ethernet port. HTTP requests and other types protocols must physically go through this channel. In most cases, an Ethernet port or WIFI card is referred to as the in-band access, because it is the primary channel of communication to the device. Out-of-band access is any method of communication that does not rely and is independent of primary channel of communication.
Why do you need remote, out-of-band access?
Without an out-of-band access, you are limited to two ways you can access your host. First is the traditional method which is discussed above. While the first method is typically robust, it is not uncommon for equipment/hosts to malfunction and lose connection to the network. In some cases, legacy devices simply do not have network access. When this happens, your next option is to pay a visit to that equipment and debug the issue locally. This situation typically requires the user to travel, which costs time and other valued resources.
SynLink PDUs provide you with a simple solution. Using relay switches, the PDU can cold boot your computer. If that fails, you can use the PDU’s console server to access the console and recover your system.
What is a console server and why is it an out-of-band solution?

In this guide, I will show you how you can configure your SynLink PDU as a console server. A console server is simply a device that gives you remote, out-of-band access to your host’s command line (also referred to as shell/console/terminal). A console server accomplishes this by tapping into your host’s other method of communication: Serial Port.
Serial communication is ubiquitous and it is always accessible regardless of the device’s internet connectivity. SynLink PDU gives you remote access to this serial communication, thus giving you a secondary out-of-band communication in case your primary connection fails.
Common Serial/Console Cabling Setup
Serial ports vary from system to system. We discuss below the most commonly found serial ports, as well as the cabling required to connect to your SynLink PDU.

| Target Device Console Port | Cable Types to Use | Notes |
|---|---|---|
| Cisco RJ45 | RJ45 to USB-A RJ45 to RJ45 Rollover Console Cable |
The USB cables have embedded USB-to-Serial Converter Chips (i.e. FTDI) |
| DB9 | DB9 to RJ45 DB9 to USB-A |
The USB cables have embedded USB-to-Serial Converter Chips (i.e. FTDI) |
| USB (w/ built-in USB-Serial Converter) |
USB Male to USB-A Male | Hosts with built-in Serial-to-USB Converter can connect directly to the "USB" port using a USB male-to-male cable. |
| USB (without built-in USB Serial Converter) |
USB Male to USB-A Male | If your target device does not have a built-in USB-Serial converter, you can still access it by using SynLink's USB "COM" port. SynLink PDUs have a built-in USB-Serial converter which allows you to connect to virtually any types of hosts. |
Setting up the Console Server
- Determine the Serial Cabling you are going to use. See the previous section for a guide on how to choose the proper cabling to access your device’s console.
- Connect the serial cable to the Host’s serial port and to SynLink PDU’s serial port.
- Access the PDU's web interface by typing in the IP address of the PDU on your favorite browser. You should be greeted with a login screen. Login with your credentials.
- Navigate to Settings->Ports. Here you will setup Baud Rate of the Serial Port you used. If using RJ45 Port A, then set the Mode to Modem mode first before setting the Modem Baud Rate.
-

- Access the the PDU's console via SSH or Telnet. You can use desktop app like Putty or Minicom. See section 3.3 of the Quick Start Guide for details on how to connect to the PDU via SSH.
- Type in modem status. Confirm that the port you are using is not being used.
- Type in modem connect. Confirm the port you want to access. You should then have access to your host’s console. Press ‘Enter’ a couple times to show your Host’s response.
-

- There you have it. You now have access to your device's serial console!
For computers without a Serial Port, use the native USB Port
Many of today's computers no longer provide a dedicated serial port. However, most do have a USB port which you can use to access the console. You just need to perform a few extra steps on your target computer, which I describe below:
For Linux-based devices:
- Using a USB male-to-male cable, connect the USB port of your device to the USB COM port on the SynLink PDU.
- On your command terminal, type in the following command: dmesg | grep "SynLink USB" -A 10
- It should return a response similar to below. Note where the SynLink USB-Serial is attached (i.e. ttyUSB0)
-

- On the command terminal, type in the following with sudo access:
- Set the baudrate:
- stty -F /dev/ttyUSB0 115200
- Redirect shell to to ttyUSB0:
- systemctl enable [email protected]
- systemctl start [email protected]
- Access the PDU's web interface and navigate to the Port Settings (i.e. Settings->Ports). Set the COM port mode to Modem and Com Baud Rate to match the Baud Rate set it previous step (i.e. 115200).
-

- SSH/Telnet into your PDU. See section 3.3 of the Quick Start Guide for details on how to connect to the PDU via SSH/Telnet.
- Type in modem status. Confirm that the port you are using is not being used.
- Type in modem connect. When prompted which serial port to access, type in usb_com. Press ‘Enter’ a couple times to get your Host’s response. You should now have access to your device's console via the native USB port.
-

For any questions/comments/concerns, please don't hesitate to contact us via phone or email. Thanks for reading!
*WLAN requires additional accessory
**Embedded 4G modem is available on select models only